Pages

ADF EMG Audit Rules 1.0 Released

Today at the UKOUG I showed a new plug-in for JDeveloper 12c together with Wilfred, the ADF EMG Audit Rules. You can find it through JDevelopers Check for Updates in the Help menu. This plug-in is a starting point for creating rules out of the code guidelines document you can find on the ADF Architecture square.


In two previous blogs I showed you how to create audit rules and how to create a fix for your audit rule using the JDeveloper Extension Framework. If you want to get your hands dirty writing some of your own rules, there now is a good starting point for that.


The idea was created during a few sessions with Wilfred van der Deijl creating our presentation, Quality Assurance with the JDeveloper Auditing Framework, for the UKOUG. The goal is to try and create an extension project, to automate ADF coding standards and best practises. The current idea is to use the ADF Code Guidelines document as starting point to create custom rules.


As time is always a critical matter in situations like this, all help is welcome. Anyone who wants to contribute and help us writing code/rules/fixes/etc is welcome to do so. I think it would be a create feature for the whole ADF community if we can write an extension that checks the most common pitfalls already during development.

As we speak we’re still working on an SonarQube plug-in to automate this rules and make them visible in JDeveloper as well as SonarQube.


Resources:
- The ADF EMG Audit Rules project on java.net.
- The ADF EMG on google.
- A thread on ADF EMG about this subject.
- The ADF Architecture Square
- The ADF Code Guidelines v1.00

Uninstall your JDeveloper Extension

Since JDeveloper 12c it’s possible to uninstall extension from your JDeveloper, without deleting jar files and cache directories manually. However, the feature is a little bit hidden, it’s not in your preferences, but in the feature section. You get there through the Tools menu.


Here you can manage your features, check for updates and clear the cache if you want to.

Now if you go to the second tab, installed updates, you get an overview of the updates installed on your JDeveloper.

If you tick for example JUnit, JDeveloper is also smart enough to recognize the dependency. It warns you that you need to uninstall both the bundles.

Next you can click the uninstall button and restart JDeveloper.

That's all it takes to uninstall an extension in JDeveloper 12c.

Write a fix for your audit rule

In a previous blog I described how to build an audit rule in JDeveloper 12c, besides the audit rule, you can also write a fix for this rule. In this example, the fix isn’t anything fancy, but it gives you an idea on how to write more complex fixes. The rule we created in the previous blog was one to check if there was an iterator in a pagedefinition file that has the attribute cacheResults set to false. 
The fix for this rule will be to set the value back to true. 

First we open the Extension.xml, in the Extension.xml insert a transform definition inside the audit-hook:

 Inside the rule-definition, insert a transform-binding:

 In the popup enter the ID you choose for the transform-definition.
The result in the extension file should like something like this:


                    JSF
                
                
                    nl.olrichs.audits.IterCacheTransform


                    sample-category
                    true
                    warning
                    
                        transform-iter-cache


                     nl.olrichs.audits.IterCacheAnalyzer


In the resource bundle, create a property for the label to display, take the transform-definition id and add .label behind it. In this case:
Next we need to create the actual Java Transform class.
This class needs to extend the oracle.jdeveloper.audit.transform.Transform class. In this class we need to create a default constructor, in this case we’re fixing an XML document (the pageDef), so we want to call the super with a new XmlTransformAdapter.

/**
     * Default no-arg constructor.
     * Calls the super with new XmlTransformAdapter.
     */
    public IterCacheTransform() {
        super(new XmlTransformAdapter());
    }
    
    /**
     * Set the attribute value (cacheResults) to true.      
     */
    public void apply(XmlTransformContext xmlTransformContext, Attr attr) {
        attr.setValue("true");
    }    

As we've seen for the audit rule with the enter and exit methods, you can write a fix (apply) for different levels (for example: Document, Element, Attr) as well. In this case we only need an fix on the Attr, so we only create an apply on this level.

Don’t forget to deploy to the Target Platform before running your extension. The result is not only a warning in the pageDef, it is also a suggestion for a fix with the label we defined in the bundle.


When you click the fix, you will see the value toggle from false to true.


For more information about creating Audit Rules, please check out my index page on topics around this subject.

Book Review: ‘Developing Web Applications with Oracle ADF Essentials’

Packt asked me to review the book ‘Developing Web Applications with Oracle ADF Essentials’ by Sten Vesterli. The book isn’t exactly a bible, it’s 270 pages long and an easy read. Sten jumps onto the recently released ADF Essentials and takes you by the hand on how to write ADF Essentials applications.
In every chapter he first explains the technique and after that uses the described technique to build a DVD rental application. You can follow his steps and build this application for yourself as well.


About the author
Sten Vesterli is an Oracle ACE Director, recognized by Oracle as one of the top 40 independent experts on Oracle Middleware and SOA. He is a regular Oracle OpenWorld presenter and also frequently speaks at Oracle user group conferences. He has written more than 60 articles and conference papers on Oracle development as well as the book Oracle Web Applications 101.

About the book
The first chapter is not about ADF Essentials, but about everything to get your environment up and running. Different freeware is installed, a MySQL database, the Java Development Kit and a GlassFish application server as well as the JDeveloper IDE and ADF Essentials toolkit.

After that, he dives into ADF going through the different layers, starting with the Business Services layer. Here the basic functionality of ADF Business Component gets explained. In chapter 3 the ViewController layer and the Model layer get explained all with the use of examples and through declarative development, showing the powers of ADF.

In Chapter 4 ‘Adding Business Logic’, the focus is more on the power of Java than on declarative development. First is shown how you can extend the business components framework. After that how to create managed beans and how to access data through the binding layer is described.

From there the focus moves away from the ADF functionality and chapter 5 is dedicated to the project setup, application architecture, project team and development structure. The example application that is build throughout Chapter 2 through 4 gets restructured as an example of how the structure of an enterprise application could look like. The deployment profiles get set up and library management is arranged.

The next subject is debugging and logging. For logging this means subjects like how to set up your logging, how to create code templates and how to interpret the output in the logfile. For debugging this includes how to set up debugging and how to debug ADF libraries used in your application.

Chapter 7 is about Security, since security isn’t a part of the ADF Essentials toolkit, Sten gives a good alternative and explains how to set up Shiro from Apache with your ADF application. Not only authentication but also authorization based on a permission & role system is explained.

Last but not least, the final chapter: ‘Build & Deploy’. In this chapter it is explained how Ant can be used for scripting the creation of artifacts and how asadmin can be used for scripting (command-line) your deployment to GlassFish. If you want to use automated build tools, explained is how to use Ant to automate all the steps (including the asadmin step).

Critical notes
In his book a lot of times Sten uses simplified or easy examples, he then posts a note to the documentation or a blog post with more information about the subject. I think this is a very good and strong tactic. However, during chapter 4, multiple times get described how you can use bindings in your page to bind a UI component in a bean class. This is done in the standard way JDeveloper generates this code for you. In light of this event I would like to point out this is considered a bad practice. See this blog post from A-team member Steven Davelaar for more info on the best practice.

In chapter 5, Sten gives his view on how to organize a project/application setup in which he uses the following example:

I would like to point out that this is one way of setting up a project structure, but there are many more. If you are interested in hearing more about this the ADF Architecture Square has a youtube channel which include a few movies about this subject.

In the last chapter about building & deploying, it is described how you can use Ant in your master workspace, to look at all the different subsystems and build & retrieve their artifacts. While this works and is a valid method for smaller applications. I wouldn’t recommend this structure for large enterprise applications. There are a lot of different ways to set up library management with tools like ant & ivy or maven. If you’re new to this subject, I would advise you to read some more documentation and information on this subject first, before making a decision in the setup of your library management.

Conclusion
First of all, the book is a very good read. It explains clearly the core functionality of ADF & ADF Essentials. It explains in less than 300 pages how you can set up your whole environment with nothing but freeware. This book also fills one of the biggest caps in ADF Essentials, the lack of build in security.
If you’re new to ADF, or never even tried it out, this book is definitely a good starting point for you!!

Write your own Audit Rule Extension in JDeveloper 12C

JDeveloper comes with a nice audit framework, one of the great things about this framework is that you can write your own code to check for specific standards or fire specific rules you want to check. If you want to write extensions in 11g I recommend one off the two following posts:
For 11R1 check Arvinder Singh's blog.
For 11R2 check John ‘JB’ Brock's blog.
JDeveloper 12C is more like the 11R2 way, but still differs in some things. Especially the blog entry by John 'JB' Brock was very useful to me.

For more information about creating Audit Rules, please check out my index page on topics around this subject.

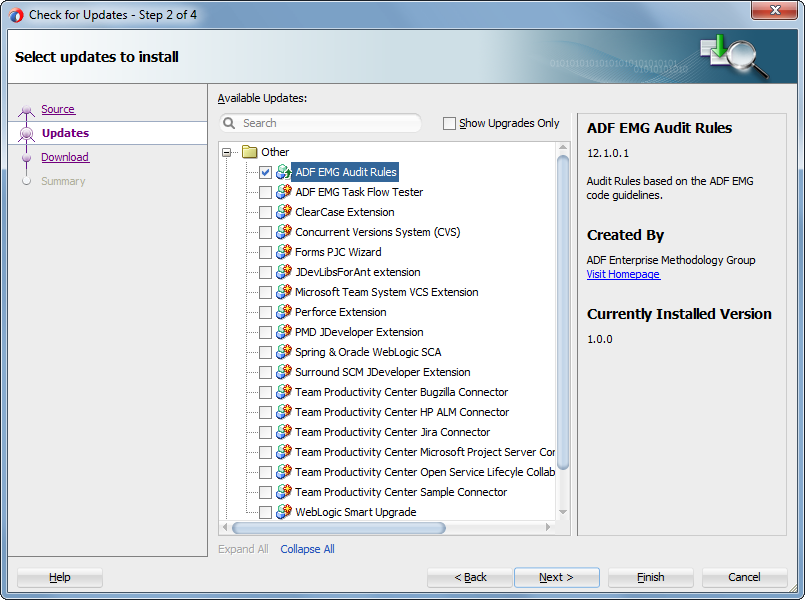
Now, before you start, don’t forget to get the Extension SDK in JDeveloper, this is very easy to download through Help -> Check for Updates -> Extension SDK. In this example I wrote a simple rule, that checks the pagedef file for iterators and wether the cacheResults property is set to false. If so, it throws a warning to point out that this setting might not be the way you want it.

Start a new Application and pick the Extension Application:

Give it a good name and except all the defaults in the other steps. By default JDeveloper creates a Res.properties file for you that is your resource bundle. Next to that it creates an extension.xml and a Manifest.mf.

The extensions.xml is much cleaner in 12C, the Manifest takes over some tasks from this extension file. The great thing is that you can use the overview from the Extension.xml where you configure your extension and that JDeveloper automaticly generates the Manifest file for you:


Next you need to configure your hook in the Extension.xml, this is where you define your Java class where the actual rule magic happens.


As said, the overview works pretty good to configure what you need in the extension.xml, but I will also give the xml snipped from the source:


                    sample-category
                    true
                    warning
                
                
                     nl.olrichs.abc.audits.inn.IterCacheAnalyzer
                                
                
                    JSF


In the triggers section, you define your audit-hook, fill in the category that it belongs to, I choose a sample-category. Set the properties on the rule-definition, make sure you give it a good ID, set the severity and put it in the correct category. Next you define your analyzer class, this is the Java Class you need to fire the rule.
Last but not least you need to define a project technology as trigger.

Next we can define some properties in the resource bundle that will be picked up automatically (notice that the resource bundle is coupled to your extension by the extension.xml):


So lets look at the actual Java class that is defined in the audit-hook. First off all, this class needs to extend the oracle.jdeveloper.audit.analyzer.Analyzer.
Next you need to inject the rule into the analyzer:
    @ExtensionResource("nl.olrichs.abc.audits.rule-invalid-iter-cache")
    private Rule CACHE_RESULT_FALSE;

Now you can hook into different enter and/or exit methods. In this example I only need the enter method for the document and the exit on the attribute. The code is in the snipped below, see the JavaDoc section for functional explanation:
   
    /**
     * Enter a document.
     * Check to see if this is a pageDefinition file. If not, we can stop here.
     */
    public void enter(AuditContext context, Document document) {
        String firstNodeOfdocument = document.getDocumentElement().getNodeName();
        if (!"pageDefinition".equals(firstNodeOfdocument)) {
            setEnabled(false);
        }
    }

    /**
     * Enter an element, put the element on the context. 
     */
    public void enter(AuditContext context, Element element) {
            context.setAttribute(elementKey, element);        
    }

    /**
     * Exit an attribute, check if this element is inside an iterator.
     * If so, check if we're an cacheResult attribute and check the value.
     * Report the results back to the Editor.
     */
    public void exit(AuditContext context, Attr attr) {
        if ("iterator".equals(attr.getOwnerElement().getNodeName()) &&
            "CacheResults".equals(attr.getName()) &&
            "false".equalsIgnoreCase(attr.getValue())) {
            context.report(CACHE_RESULT_FALSE);
        }
    }

Now that the rule is set up, lets look at running and testing this rule. What I do first is deploy the extension to the current platform:


After this, you can deside to Run or Debug the extension by right clicking the project and select Run or Debug Extension. You will see that a new instance of JDeveloper gets started and you can test your extension in here.

In the newly started JDeveloper, you can make a final check in your preferences to see the rule. Here you can configure your Audit profile. Go to Tools -> Preferences -> Audit -> Profiles:

Here you should see the category that you filled into your resource bundle and under it the rule that your just created. Make sure the checkbox is enabled so it will run.

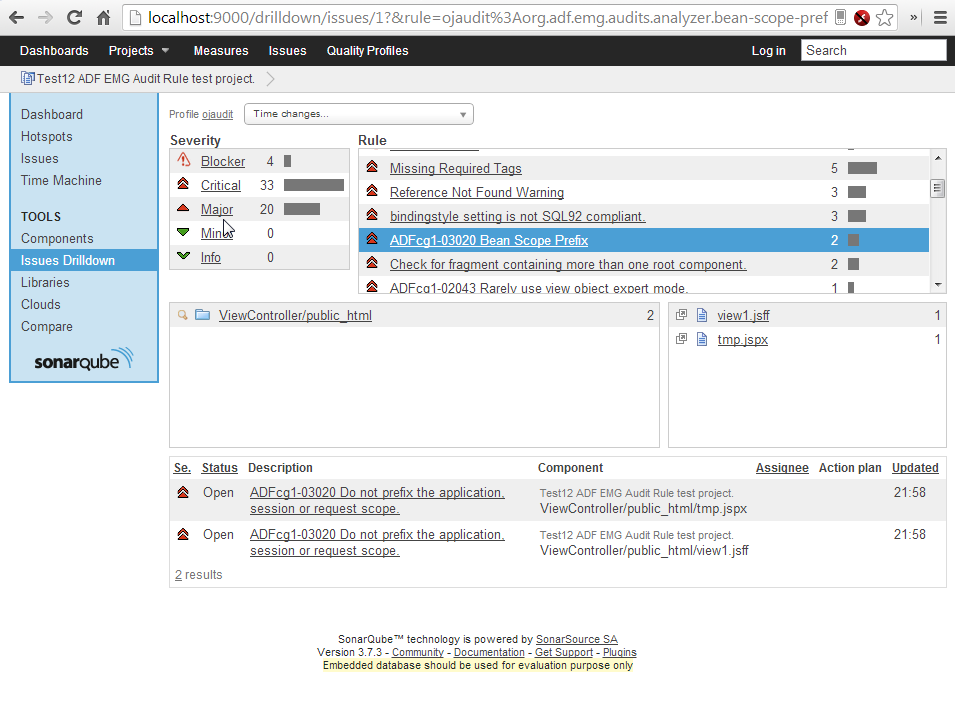
I created a fake pageDef with an iterator and the cacheResult property set to false. You see that the rule gets fired and the configured message from the resource bundle is shown. You also see the warning on the right top in the source editor:


Create your Selenium test reports with Ant

In the previous blog post I described how to JUnit test your Selenium tests. Once you have this set up, you can use Ant to run this tests and create a report about the results.

Since there are standard targets for JUnit and JUnitReport in Ant, the Ant file is pretty clean. We start with setting up our environment, including a clean target. The tool I use to display the XML on my blog makes it a bit messy, but you get the idea:


We set up the output directories, the reports will come in the reports directory. In the Lib directory, we put the selenium standalone jar file that is used to run the Selenium test in JUnit. As well as the JUnit jar to run the JUnit test itself.

After that there are two targets, prepare and compile:


In the prepare we set up the structure and create the directories that we need. In the compile we look for all the java sources in the src directory and compile them to the classes directory. Now all that is left is a target to run the JUnit and create the reports:


I choose not to split those two target, since I never want to run a test without creating the reports or vice versa. The JUnit runs all the tests that are in the classes dir, where the compile target puts his output, he runs the JUnit test using the classpath that is set up in the environment and puts this in the output directory.
After this the JUnitReport tasks picks up the reports from the output directory and creates a HTML structure off all the tests that are ran. This is how the index.html looks:

  
You see an overview of the tests, the failures and erros, all clickable to drill down for more information.
If you like you can browse through the packages & classes.

JUnit test your application with Selenium

We want to test our ADF application with Selenium. To get this working, we use the Selenium IDE (Firefox plugin) to record a session. You can export this recorded session to different formats, since we are mainly Java/ADF developers at our project, we choose to export to Java.

Because we build ADF applications with the JDeveloper IDE, this is the preferred IDE to build the JUnit test as well. In the Fusion WebApplication I created an extra Project called ‘SeleniumTest’.


To get it working, you need to have the JUnit extension, you can easily install this through the Help -> Check for update menu.
Next to that, you also need to add the selenium-server-standalone jar, to your project. You can download the latest version from the Selenium download page.

First we’re going to record a session with Selenium. Start your application, open it in firefox and open the Selenium plugin. After that click the record button.


Now just navigate to your application, in this example I got a form and a table, I click the next button two times navigating to the ‘Purchasing’ department. For this example we’ll keep the test clean and simple.


Stop the record session by clicking the record button again, you’ll see it has recorded the clicks.
If you want, you can replay it with the play button to check if it works.


Now export your file through the menu File -> Export -> Java / JUnit 4 / WebDriver.


Save this Java file in your SeleniumTest project, after this you need to rename your package in the java file. In this java class you see a few methods, we’ll focus on two off them for now, the setUp and testHr.

 @Before
  public void setUp() throws Exception {
    driver = new FirefoxDriver();
    baseUrl = "http://127.0.0.1:7101/";
    driver.manage().timeouts().implicitlyWait(30, TimeUnit.SECONDS);
  }

Here the Firefox driver is initiated and the baseUrl is set.

  @Test
  public void testHr() throws Exception {
    driver.get(baseUrl + "/SeleniumAntJenkins/faces/untitled1.jspx");
    driver.findElement(By.cssSelector("#b3 > a.xg7 > span.xgf")).click();
    driver.findElement(By.cssSelector("#b3 > a.xg7 > span.xgf")).click();
  }

The testHr method is the actual JUnit test that get launched after the setUp.
There is one bug in this generated class. As you can see the baseUrl ends on a slash and the first line in the testHr method adds a slash. I prefer to change the baseUrl and remove the last slash behind the portnumber.

Now your test is ready to run.
Just right click the java class and run (or debug, as you prefer).


You’ll see that a FireFox browser is launched (with the text WebDriver in the right bottom). It follows the steps in your test case and closes the browser again. After that you see the green positive result in the JUnit test runner.


That’s all it takes to set up a simple JUnit test that does a functional (screen) test with the help of Selenium in the JDeveloper IDE.

Use Coherence cache with WebCenter Portal

On our last WebCenter Portal project, we didn't configure Coherence as our caching mechanism, but we used the default caching mechanism for the content presenter. During the development phase, we didn't really have any problems, until we started with a load & stress test on our application.

During the load test we saw a lot of 500 Errors. In the application log files we noticed the following NullPointerException was logged, especially the caused by clause was interessting:
Caused By: java.lang.NullPointerException
at java.util.LinkedHashMap.get(LinkedHashMap.java:333)
at oracle.wcps.cache.internal.MapCache.get(MapCache.java:142)
at oracle.webcenter.content.integration.spi.ucm.UCMCacheHelper.getSecurityInfo(UCMCacheHelper.java:279)
at oracle.webcenter.content.integration.spi.ucm.SecurityInfoHelper.getCachedSecurityInfo(SecurityInfoHelper.java:122)
at oracle.webcenter.content.integration.spi.ucm.UCMBridge.checkSecurityLevelForNode(UCMBridge.java:2626)
at oracle.webcenter.content.integration.spi.ucm.UCMBridge.canAccessNode(UCMBridge.java:2591)
at oracle.webcenter.content.integration.spi.ucm.NodeOps.getNodeFromCache(NodeOps.java:700)
at oracle.webcenter.content.integration.spi.ucm.NodeOps.getUCMNodeWithId(NodeOps.java:1480)
at oracle.webcenter.content.integration.spi.ucm.NodeOps.getNodeWithId(NodeOps.java:153)
at sun.reflect.GeneratedMethodAccessor752.invoke(Unknown Source)

We were able to reproduce this behavior quiet easily, with a load test from 10 sessions for 2 hours. After contact with Oracle Support about this issue, we decided to build in the Coherence caching mechanism.

It's not that hard to implement this feature, for example see a blog by the a team about Coherence cache. 

Ever since we're using Coherence instead of the default caching mechanism for the content presenters, the issue hasn't occurred anymore.

Drag your panes outside JDeveloper in 12c

One of the first things I noticed about 12c is the movement of the panes from the view menu to the window menu. I sometimes get a bit too aggressive in closing a lot of the little panes. When I want to get them back later, I just use the View menu (Window menu from now on) to get them back.


However, I noticed another really great features in JDeveloper 12c. You can drag your panes outside of your JDeveloper in 12c. This can be helpful if for example you want a small log window showing on your other monitor, but not the whole JDeveloper.
Just like you normally move a pane around in JDeveloper, for example I like to have my properties on the bottom instead of on the right side, click the pane and drag the pane out of your JDeveloper window.


Besides this, you can also reorder you tabs in JDeveloper by simple drag & drop, just like you're used to in your browser.

Look into your JVM with VisualVM

If you want some more information about your JVM, for example your integrated WLS. There is a very easy tool to use, it’s called VisualVM. You can download it from visualvm.java.net. Extract the .zip file and run the \bin\visualvm.exe.

Once the application is started, on the left you can pick a running java container, for example under Local your WebLogic. If you want, you can add remote hosts as well:


Selecting one opens an overview:


Now if you click the monitor tab, you can get more info about CPU, memory, classes and threads. Below an example of a memory graph:

Don't persist UIComponent state, now with attributes!

In this blogpost I showed how to disable the persistence of a UIComponent, but it was needed to write Java code to check for the specific component and change. In this blog entry I will show a more generic way to do this, with the attribute tag.

On the showDetailItem we define an attribute with a name and value:


The Java code for the addComponentChange method in the PortalComposerChangeManager now looks like this:
  public void addComponentChange(FacesContext context, UIComponent component,
                                 ComponentChange change)
  {
    Map attrs = component.getAttributes();
    String value = (String) attrs.get(NON_PERSIST_STRING);

    if (value != null)
    {
      logger.fine("NonPersist attribute found, we don't persist!");
      return;
    }
    super.addComponentChange(context, component, change);
  }

I defined a static final NON_PERSIST_STRING with the value "nonPersist", like the name of the attribute. If the attribute is found, we don't persist the componentChange.
If you want a more specific approach, you can still check for a specific ComponentChange, in the case of this example, we still check if the ComponentChange matches the value in the attribute (disclosed):
  public void addComponentChange(FacesContext context, UIComponent component,
                                  ComponentChange change)
  {
    Map attrs = component.getAttributes();
    String value = (String) attrs.get(NON_PERSIST_STRING);

    if (value != null)
    {
      if (change instanceof AttributeComponentChange &&
          value.equals(((AttributeComponentChange) change).getAttributeName()))
      { //we check if the attribute value equals the change.
        logger.fine("{0} attribute found; {1} event on {2}, we don’t persist.", new Object[]
            { NON_PERSIST_STRING, value, component.getClass() });
        return;
      }
    }
    super.addComponentChange(context, component, change);
  }

This code can be expanded or changed to check for specific changes according to your needs.
I uploaded a new workspace here, so you can download and browse the source if you want to.

Support for multiple session timeouts


Our use case was that we needed to support different timeouts for different application roles. This because our internal users are using the same application as our external users. There is no default support for this behavior in ADF, but you can achieve this by using a PagePhaseListener.

In our production application we used different settings, but for this example I configured the following web.xml parameters:
 
    3
  
  
    oracle.adf.view.rich.sessionHandling.WARNING_BEFORE_TIMEOUT
    60
  
The session-timeout is set to 3 minutes and we want to show the default ADF warning popup 1 minute before the session expires. In case of a internal user login, the session-timeout parameter get overridden.
This is achieved by creating a PagePhaseListener:
public class PortalPhaseListener implements PagePhaseListener
{
  private static final int INTERNAL_TIMEOUT = 360;

  public void beforePhase(PagePhaseEvent pagePhaseEvent)
  {
    if (pagePhaseEvent.getPhaseId() == JSFLifecycle.JSF_RESTORE_VIEW_ID)
    {
      final ExternalContext ectx = FacesContext.getCurrentInstance().getExternalContext();
      final SecurityContext secCtx = ADFContext.getCurrent().getSecurityContext();     

      if (secCtx.isAuthenticated() && isInternalUser())
      {
        final HttpServletRequest httpServletRequest = (HttpServletRequest) ectx.getRequest();        
        httpServletRequest.getSession().setMaxInactiveInterval(INTERNAL_TIMEOUT);
      }
    }
  }
}
I decided to do this in the restore view phase, first we check if the user is logged on and if the user has the internal role. If both are true, we set the MaxInactiveInterval on the HttpSession.
Now the timeout becomes 6 minutes, meaning that after 5 minutes the default ADF popup will show, informing the user that the session will expire if no activity is shown within the next minute.

The result is a different session timeout for different user roles, you can do this for as many roles as you like, making your timeout settings more flexible. 

Don’t persist UIComponent state in the session


Our use case was as followed: In our WebCenter Portal application we have a tableform layout, with a panelAccordion on the form layout. For other functionality we needed MDS persistence to be on, so we couldn’t disable MDS customizations. A side effect was that the panelAccordion remembered the showDetailItem that was disclosed and reopened the form page on the previously disclosed tab. 

We have the Seeded Customizations enabled, you can do this through the project properties:
 This results in a web.xml entry:
  
    org.apache.myfaces.trinidad.CHANGE_PERSISTENCE
    oracle.adf.view.page.editor.change.ComposerChangeManager
  
Now we can configure our adf-config file to exclude Persist Changes:

However, this doesn’t help you for your current session. We can see in the JavaDoc from the FilteredPersistenceChangeManager, the following documentation:
If the DocumentChange fails through the restriction, the corresponding ComponentChange is persisted to the Session.

We also don’t want to persist the changes in the session, so we had to subclass the ComposerChangeManager and override the addComponentChange method:
public class PortalComposerChangeManager extends ComposerChangeManager
{
  /**
   * adf-config.xml still persist in session, @see FilteredPersistenceChangeManager
   * We don't want this for the showDetailItem in the RichPanaelAccordion.
   *
   * @param context the FacesContext.
   * @param component the UIComponent.
   * @param change the ComponentChange.
   */
  @Override
  public void addComponentChange(FacesContext context, UIComponent component,
                                 ComponentChange change)
  {
    if (component instanceof RichShowDetailItem &&
        ((RichShowDetailItem) component).getParent() instanceof RichPanelAccordion &&
        change instanceof AttributeComponentChange &&
        "disclosed".equals(((AttributeComponentChange) change).getAttributeName()))
    {
      logger.fine("ComponentChange; disclosed event on showDetailItem in a RichPanelAccordion, we don’t persist.");
      return;
    }
    super.addComponentChange(context, component, change);
  }
}

This method is called by the framework to persist the component change. We override this method and  check if the component is a RichShowDetailItem in a RichPanelAccordion. If the ComponentChange is also a disclosed event, we don't call the super, so this change doesn't persist.

Since I don’t have my Oracle Cloud Trial anymore, I included a workspace, which reproduces this behavior. 
You can see the difference between the two accordions by changing the web.xml parameter. State is saved in session with the default web.xml param:

    Change Persistence Parameter
    org.apache.myfaces.trinidad.CHANGE_PERSISTENCE
    oracle.adf.view.page.editor.change.ComposerChangeManager
  

You can see the panelAccordion resetting to the first showDetailItem when you change to this parameter: 

    Change Persistence Parameter
    org.apache.myfaces.trinidad.CHANGE_PERSISTENCE
    nl.olrichs.blog.panelmds.portal.view.change.PortalComposerChangeManager


All you need to do for reproducing is:
  • Click the button toPanelAccordion.
  • Open a different showDetailItem.
  • Click the back button.
  • Click the button toPanelAccordion again.

Full screen mode with panelSplitters

We had a use case in which the input form needed to have a full screen button. This is accomplished with the help of panelSplitters and javascript. In this example I’ll show how you can create a button that will execute javascript to render the input form in full screen. The page looks like this:


We used 3 panelSplitters in the page setup, in the center is the input area, the other area’s are for menus, helptext, etc. On the top of the center area we have a button bar with several buttons including the full screen button. The button has an clientListener on it to call the javascript:


The javascript code is as followed:
function toggleFullScreenMode(actionEvent)
{
   actionEvent.cancel();
   var panelSplitter1 = actionEvent.getSource().findComponent('::ps1');
   var panelSplitter2 = actionEvent.getSource().findComponent('::ps2');
   var panelSplitter3 = actionEvent.getSource().findComponent('::ps3');
             
   var newMode = !panelSplitter1.getCollapsed() || !panelSplitter2.getCollapsed() || !panelSplitter2.getCollapsed();

   panelSplitter1.setCollapsed(newMode);
   panelSplitter2.setCollapsed(newMode);
   panelSplitter3.setCollapsed(newMode);
}

Now if you click the button, all the panelSplitters will collapse, if you click it again, they will show again.


I’m sad to say the Oracle Cloud Trial expired, so no live demo application this time.

Fancy inputsliders through declarative component

In one of our portals the user can use inputsliders to select different values. We made a fancy inputslider that shows not only a label, but also the minimum value and the maximum value allowed.
Next to the slider we have an inputText where the user can decide to type in the value, on this inputText we have a validator that also checks the min an max value.
The result looks like this:

The declarative component has 4 attributes: minval, maxval, value and label.
The code in the component definition is as followed:


The minvalue and maxvalue attributes are used for the labels, the minimum and maximum attribute on the inputNumberSlider and the validator on the inputText. The label attribute is used as label on the panelLabelAndMessage and the value attribute is used as value for the inputNumberSlider.

To illustrate an example of you easy it is to now use this declarative component I created a bean with five properties:
  public SliderBean()
  {
    lowpoint = 1;
    minval = 25;
    maxval = 75;
    highpoint = 100;
    value = 50;
  }

There are 3 sliders based on this properties, the first one to select the minimum value, the second one to select the maximum value and the last one to select a value.
It is very easy to create a slider based on this declarative component, all the code you need for 3 sliders is this:


Off course the page / sliders still need skinning, but you can look and play around with this example.

Get your version number from WebLogic


If you want to show the version of your application (for example in your template), you can get this from WebLogic in a bean. If you use the manifest.mf to set the Weblogic-Application-Version property, you can get this number with the help of the ApplicationVersionUtils. It’s in the package weblogic.application.utils:

 ApplicationVersionUtils.getCurrentVersionId();


Scope your breakpoints!

For something so simple, a breakpoint, this feature gave me a lot of headaches over the years. One off the things I find most frustrating is when I set a breakpoint in my source code and the debugger doesn’t stop on it. Recently a co-worker pointed out some great feature in the JDeveloper IDE: You can scope your breakpoints.

When working with small projects and workspaces for different functionality, we use a lot of libraries to include our jars, sources and docs. If you have a java file open from a different workspace, the debugger won’t always stop. 

The first sign is the red bullet without a green check in it. 


However, remember that if the class isn’t loaded by the compiler yet, the green check will also not show. If you know for sure that the code has been fired, for example because you see logging, but the debugger doesn’t stop there and the bullet is still red without a green check, scoping might be the answer!

One option is to Scope an individual breakpoint, you can do this in your breakpoints view, right click on it and go to Change Scope, then select a different scope. The default is Workspace, I suggest you put it on Global.


Now, I can’t imagine why you would want something else then the Global scope, so luckily the JDeveloper IDE has a preference to set for this.
Go to Preferences -> Debugger -> Breakpoints, and you can change the scope for all your future breakpoints.


This will result in happy green checks on your red bullets!

Display the correct symbol in front of your currency

When you build an application, often you need to display some sort of currency. It can be tricky to get the correct currency symbol. If the configuration is not correct, a strange image that looks like a circle with 4 legs can be shown by your application:

For some reason, this depends on the formatting locale. As if your product would be the same price in dollars as it would be in euro’s or any other currency. Off course this is usually not the case, so you want to set one currency for your application.
This can be very easily done, you need to set the correct formatting-locale in the trinidad-config.xml file.
If you adjust the trinidad-config like this:

 fusionFx
 en_US


It will result in:

Now if you live in the Netherlands, like me. You need more than just the euro symbol. Our decimal separator is a comma and not a dot. However, our number group separator is an dot and not a comma. This are two separated trinidad-config entries.
The following configuration:
 

  nl_NL
  .
  ,


Will result in:

I build a quick demo application to show the possibilities.
You can choose the formatting locale and the group separator, the decimal separator is not set and will depend on the locale your choose.
To show the results I use an outputFormatted with a convertNumber on it. Like this:


If I change the locale from en_US to nl_NL, the symbol changes, but the group separator doesn’t.

This demo application is deployed in the cloud here, so you can try it out yourself if you want.